The Enfield Bullet Manual
- by Pete Snidal (C)2003
Diagnosing Spark Problems
Do You Have Sparks?
Your engine needs a clean, bright, blue spark at the spark plug at the
beginning of every power stroke. To determine whether this is being
made available, the simplest test is to remove the plug -be sure to
clean all dirt and grunge away from the region of the plug base before
removing with a suitable spanner - and lay it on the cylinder fin beside
the spark plug hole, with the heavy high-tension wire reconnected, and
the plug base making good electrical contact with the cylinder fin.
Then, with the ignition on, turn the engine over with the kickstarter,
(gearbox in neutral) while observing the gap at the end of the plug. At
each power stroke, you should see a bright blue spark at the plug tip.
If there is no spark, it's time to begin looking at the following:
The Fuse
If your fuse is not conducting, nothing electrical will work. No
stoplight, turn signals, horn, or any lights, with ignition switch on or
off. In this instance, first try replacing your fuse. Then, if still
no joy, check the battery terminal connections and battery chassis
ground for cleanliness. Disconnect the connections, buff up all
surfaces with a piece of sandpaper - or a knife or screwdriver blade, or
even a flat rock, and re-assemble. If you find that you have some
electiral elements working - such as the lights or horn, proceed with
the following ignition system tests:
- 1. Faulty Spark Plug
- 2. Faulty Ignition Points or Adjustment
- 3. Poor Connection - 12V Circuit
|
- 4. (Electronic Ignition) Faulty Module
- 5. (Electronic Ignition) Faulty Reluctor
|
1. Faulty Spark Plug
A spark plug can be faulty due to "fouling" - the insulation portion of
the tip - the part normally inside the combustion chamber - becomes
coated or impregnated with electrically conductive foreign material -
generally combustion biproducts - which "short out" the voltage pulses
from the coil without producing a spark across the gap to ignite the
fuel mixture on the power stroke. The test for this is obvious -
replace the plug with your spare - you DO have a fresh spare in your
toolbox, don't you? - and try with this known-good plug. If still no
spark, look to the next step:
Faulty or Maladjusted Ignition Points
There are a number of steps involved in checking the ignition points.
First, are they opening and closing when the engine is turned over with
the kickstarter?
2. Checking Points Operation
Remove the cover of the contact breaker (behind
the cylinder barrel - accessible from the left side of the machine).
Using the compression release and the kick starter, rotate the engine,
observing the points for opening and closing action. If they DO open
and close, the next step is to check for burning and gap.
Once the points have reached their maximum opening, first examine them.
With your screwdriver, pry the moving point away from the stationary one
and check for burning or pitting of either of the point surfaces. (If
there are any such signs, the points must be removed and dressed with a
fine file and replaced - or replaced with your spare new ones. (I hope
you have a spare set in your toolbox? Put away dry and safe in such as
an empty 35mm film canister?)
| If both point surfaces are clean and shiny, check the gap between them
(at wide open) with a - .015 - ,4mm feeler gauge - you want a "just tight"
fit. If not, adjust the opening by first loosening the fixing screw,
(F in the photo
shown), and, using a screwdriver inserted between the two dimples and
the slot in position shown as A, adjust the point opening until the
feeler gauge is just a tight slip fit
between the points. Then tighten the fixing screw (F). Leave nuts
labelled (T) alone - these allow rotation of the breaker plate to make
adjustments in timing. |

|
3. Checking 12V Primary Coil Circuit
The circuit path, from the battery, is through the following components:
- Ammeter
Ignition Switch
-
- Engine Cutoff Switch (if fitted)
- Coil primary winding
- The Breaker Points back to ground through the Contact Breaker
Body
- The wires in between these components
Checking the primary circuit is a simple matter of looking at the
connection points of each component in turn, starting at the end and
working backwards, until power is found. Presence of power is indicated
by lighting of a test lamp, or, in cases of need, sparks.
Primary, but No Secondary Spark
This condition can be due only to one of four causes:
| Cause |
Solution |
| Shorted (fouled) spark plug |
Replace with Known-good plug |
| Coil High-Voltage (output) wire shorted or corroded |
Clean Wire - especially the ends |
| Excessive wet dirt/mud/dust on coil tower |
Clean coil tower and dry thoroughly |
|
| Faulty secondary winding in coil |
Replace with known-good coil |
Primary Spark
The simplest and therefore first check of the 12V primary system is
simply one of opening the closed points with the ignition on. Just
rotate the engine until the points are closed, then turn on the ignition
and pull the moving point open from the stationary one with an insulated
tool, such as a plastic-handled screwdriver or dry piece of stick.
(Although there is only 12V present, which will not shock you, the
phenomenon of "inductance" and "back emf" can often wake you up!)
You should see (and usually hear) a spark at the points on opening.
Furthermore, when this Primary Spark occurs, a Secondary Spark should
also occur at the plug, if it's still set up as described above.
If the primary spark thus produced does not produce a secondary spark at
the plug, hold the spark plug connector wire (with the rubber boot
pulled back if necessary, or a short bolt inserted into the connector)
about 1/4"-6mm from the cylinder head, and twitch the points again. If
you still get no secondary spark, either the coil secondary wire or the
coil itself is faulty.
If you do get both sparks, then turn the engine over with the
kickstarter - ignition still on - and look for the primary and secondary
sparks as the distributor rotor opens the points on each revolution. If
not, but spark occurs with physical manipulation of the points, re-set
the contact breaker gap as describe above and try again. In extreme
cases of getting the first but not the second, replacing the pointset
with a new one may be necessary.
No Primary Spark?
If no primary spark can be induced, try rotating the engine until the
points are open, then "shorting" the moving point to ground with a
screwdriver contacting the point and the Contact Breaker body (watch
that your shorting bar is insulated!) As you break the short circuit
connection, you should see and hear a spark. If you do, but not with
the points themselves opening, replace the points. If not, it's time to
check the circuitry by moving back up the line.
The Coil Primary
For the following checks, you will need a test lamp, with one side
grounded to the chassis, preferably the engine, and the other to the
various test points.
First, check that there is power present at the coil primary terminal -
the (+) one (generally White or Grey) - not the generally Black one
not connected to the Contact Breaker. Use a test lamp, since jumping
this to ground (ignition on, of course) will blow your fuse if the
wiring is good. If there is power present here, with ignition on and
points open (although the bulb should light dimly with points closed,
if it's a low-draw test lamp), check for power at the other primary
terminal - the black-wired (-) one. If you have power at the (+)
terminal, and no power at the (-) terminal, with the points open and the
ignition on, then the primary winding of your coil is burnt out, and the
coil must be substituted with a good one.
No Power At Coil (+)?
If there is no power present at the coil (+) terminal, you may test
the coil, the points, and the connecting wire between them by "jumping"
a temporary connection directly from battery (+) to coil (+), then
testing for spark at the plug with engine turning over as described in
step 1 above. If this produces sparks, you may now firm up the
temporary jumper connection and ride home to fix it properly later.
To fix it properly, later or on the spot, remove the jumper wire and
continue to trace backward up the line for power. Next, after the coil
(+), if no power is present, check the output of the last switch in line
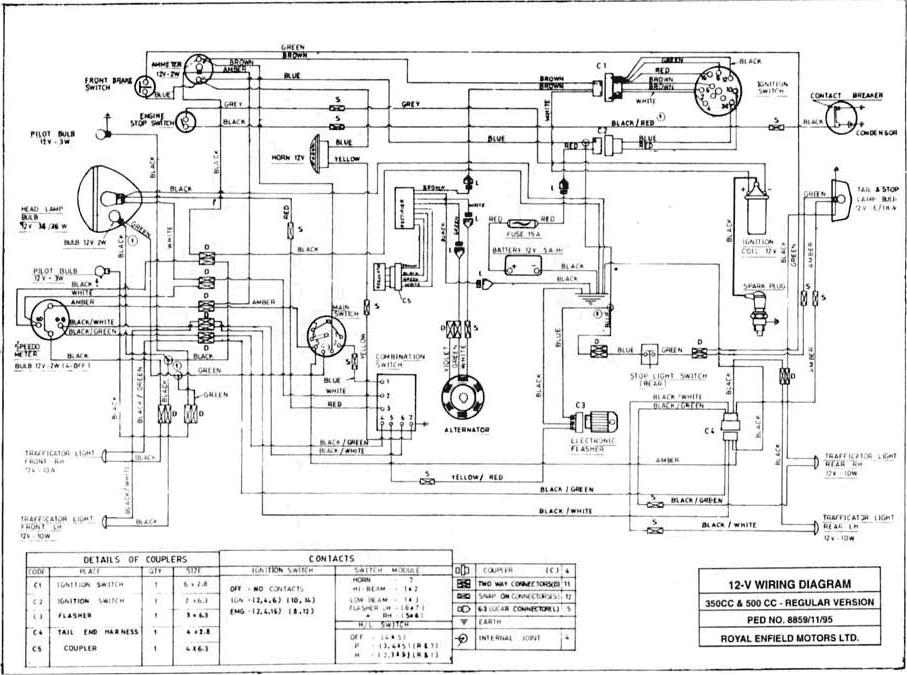
- eg. the ignition switch, on the Home or UK models. (see
diagram - Home Models. If there is no power
at this white wire on the ignition switch, (switch on and points open!)
then check for power in at the switch - the Red wire from the battery
fuse. If there is power at the input wire to the switch, but none at
the output wire from the switch (red and white respectively), then the
switch itself is faulty and must be replaced.
Indian (Home) Models -
note that rubber snap connector C2 is a likely source of trouble, and is
connected between the fuse holder and the ignition switch. Check the
red wire in and out of this connector - or jump with a temporary wire
directly from battery (+) to the Red Switch Input connection. (You will
likely have to strip the insulation from the red wire in a small spot -
or drive a pin through the insulation into the conductor inside to make
a connection.)
The UK Models do not have this C2 connector.
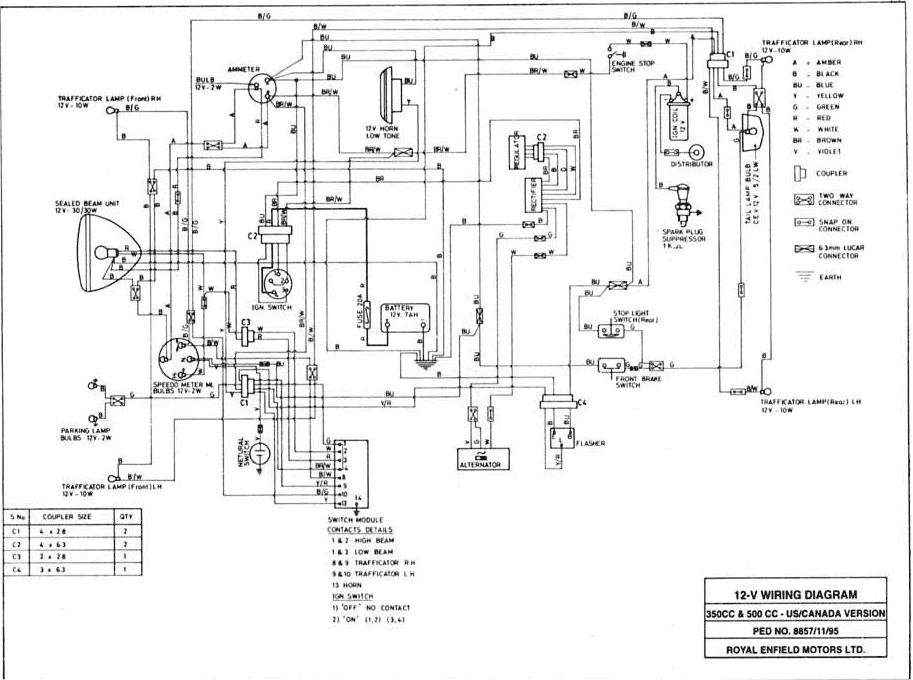
North American Models - these models usually have a
handlebar-mounted engine cutoff switch, which is fitted electrically
speaking between the ignition switch and the coil input.
see diagram If the cutoff switch has no output, check its input - the
Brown/White wire from the Ammeter (+). If no power here, check the
output from the ignition switch - also Brown/White, and if no power
here, the Red Ignition Switch input wire from the fuse.
In all models, a temporary jumper wire direct from battery (+) to coil
input terminal (+) will serve to test all elements of the system from
battery to coil. If this cures a non-spark situation, there is
something wrong "upstream" from the coil. If not, either the coil
itself, or one of the "downstream" elements - connector wire or contact
breaker points or internal connections - is bad. (This is assuming the
battery ground connection is clean and good - indicated by lights and
horn working.)
When you find input into an element of the system - a conductor wire or
switch, but no output from that element, you have found the problem.
Replace the faulty switch or if a conductor wire, "jump" it permanently
with a known-good piece of wire, preferably of the same colour, and just
tape it alongside the existing loom.
Electronic Ignition Systems
After-market electronic ignition systems, often considered very
"upscale" by the techo/retro set (Old-Design Motorcycle Good; Old-Design
Ignition system Bad! - Go Figure!) present a different set of challenges
in the instance of spark failure. Since solid-state
electronic/capacitor discharge ignition systems are difficult to
impossible to repair on the road or in the (mechanical) shop, the wise
owner will pack a spare "magic box" and reluctor (the little coil in the
CB housing) with his riding spares, since replacement with a
"known-good" spare is the only reliable way to verify functionality.
(Or not.)
There are, however a few other possibilities which may be investigated:
- Low Battery: Electronic Ignitions have a "Low Voltage Threshold"
under which they will not operate. This is high enough so that, even
though the lights will still operate (in some fashion), there will not
be enough voltage to fire the voltage-hungry black box. So verify that
your battery has a full charge before going further - it is perfectly
safe to "jump" your battery to that of a nearby machine, be it car,
motorcycle, or even large truck - contrary to popular opinion, the size
of the jumping battery will have no deleterious effect on the jumped
battery; only the voltage. (ie, DO NOT jump your 12V battery with a 24V
system, nor your 6V (old bike) with a 12!
- Connections: Check for integrity of wire connections:
After-market systems, such as the Boyer (TM) are simple enough in their
external wiring. They will have a "hot" wire from the ignition switch
(probably Red), a "Ground" wire to ground (probably Black), and a pair
of wires to the Reluctor Coil in the Contact Breaker (on a plastic plate
which replaces the regular points plate.) There will be 2 wires from
box to reluctor. Ensure that all connections are solid, and that the
"hot" wire has power to ground, and that the "ground" wire is connected
to a reliable chassis ground. Ensure also that the wires to the
ignition coil are connected reliably. The Box needs power to operate, a
trigger signal from the reluctor, and a connection circuit to the spark
coil to fire a spark. If these connections are functioning, and the
box, reluctor, and coil are well, sparks will occur.
- Coil Testing: Since the Electronic CD system uses the same coil,
it (the coil) may be tested with normal DC methodology. To verify coil
operation, you can disconnect it from the Electronic systems feed wires,
and temporarily jump from the battery (+) to the Coil (+) (BE SURE TO
DISCONNECT FROM THE MAGIC BOX!) and, with the plug in test position on
the cylinder head, "flick" a grounded jumper wire to the coil (-)
terminal. If you get a spark at the plug, the coil is good, if not,
replace the coil with a known-good one (any 12V coil will do) and test
again. If you get spark with the jumpers, connect the replacement coil
to the electronic system (observe polarity!) and try again. This may
result in a "get you home" functionality. If the coil fits, and is true
12V (most automotive and electric-start applications use an 8V coil for
a 12V system, necessisitating the addition of a series resistor),
install it permanently and ride on!
Of course, if the coil checks out, and re-connecting the electronic
system results in no spark, and the wire connections are good,
you'll have to try a substitute box and then, if necessary a substitute
reluctor. (First with the old box, then, if necessary, with the new
one.)
If the above considerations are met, and there is still no spark,
replace parts with "known-goods" until the spark returns. When it
finally comes back, discard the last part you replaced - and be sure to
replace your replacement spare with a fresh one for next time!
Hit your browser's "back" button to return to the previous page
---